
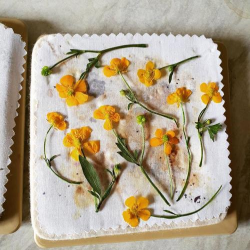
A guide of the different ways to press your precious flowers
Pressed flowers are nature’s little treasures that allow us to capture a moment in time. Whether it’s a thoughtful bouquet from a loved one or blossoms from a special occasion, pressing flowers is an art that lets you preserve their beauty and keep the essence of spring and summer blooms alive. What’s more, these pressed flowers can be used for various creative endeavors, such as framing, gifting, or enhancing handwritten cards. The best part? You can achieve this with simple household supplies.
Selecting Flowers for Pressing
If you’re keen on pressing flowers from a bouquet, time is of the essence. It’s best to start as soon as possible to maintain their freshness. Choose a selection of flowers while they are in their prime.
If you prefer to pick your own flowers from the garden, opt for the morning when the dew has evaporated. Harvest them just before their peak or when they are about to bloom. To create a beautifully natural look for framed pressed-flower art, gather blooms and foliage at various stages of development. Remember, the better the quality of the flowers when picked, the more stunning they will look when dried and pressed.
Prepare the blooms by placing the stems in water immediately after cutting. Submerge them in a sink, recut the stems at an angle for better water absorption, and place them in a vase with water and floral food.Generally, flowers with naturally flat blooms are the easiest to press, such as violets, daisies, and single-petal roses. If you’re working with flowers that have prominent stamens, like alstroemerias and lilies, remove the stamens to prevent staining from the pollen. Leaves and ferns also flatten nicely. Don’t be discouraged if you’re interested in pressing chunky flowers like multi-petal roses or carnations, or even fruits and vegetables. While these require more time and attention, they can be pressed successfully.
Supplies for Pressing Flowers
Before you embark on your flower-pressing adventure, ensure you have the right supplies at hand. Most of these items can be found around your home:
1.Absorbent Material:
You’ll need absorbent materials such as newspaper, blotting paper, printer paper, flat coffee filters, flat cardboard, or plain, untreated facial tissues. These materials are essential for absorbing moisture and facilitating drying. The goal is to dry the flowers quickly to prevent browning. Avoid using paper towels or waxed paper, as they can leave unwanted imprints or retain moisture.
2.Pressing Techniques:
Experiment with different pressing techniques to find the one that works best for your chosen flowers. Trial and error will help you determine the ideal arrangement for your blooms.
3.Pressing Tools:
While you can purchase or create a wooden flower press, three simple techniques work just as effectively and won’t cost you a dime.
How to Press Flowers in a Book


The simplest method for pressing flowers requires no special equipment beyond absorbent paper and a heavy book or phone book. To protect valuable books from staining, place an extra layer of paper on each side of the flowers.There are two ways to use this technique. You can start by placing the flowers between two layers of plain, absorbent printer paper and then stack heavy books on top.
Alternatively, insert the flowers directly between the pages of the book, ensuring at least 1/8 inch of space between multiple pressings. Weigh down the top of the book with a brick or another heavy object. Allow the flowers to dry for a week before checking on them. At this point, consider replacing the absorbent material and continue drying for an additional two to three weeks.
pressing Flowers With an Iron
Similar to the book method, begin by placing the flowers between two pieces of absorbent paper. Set your iron to a low heat, ensure there is no water in the iron, and avoid adding water to prevent moisture from affecting the process. Prepare the flower for pressing by placing it between the absorbent paper, and use a heavy book to flatten it. Next, place the paper and flowers on a small tabletop ironing board and press the warm iron gently on the top sheet of paper for 10 to 15 seconds. There’s no need to make gliding motions like you would when ironing clothes. Allow the paper to cool for 10 to 15 seconds before repeating. Check periodically by carefully lifting the paper to see if the flower is stiff and dry.
pressing Flowers Using the Microwave
While using high heat on flowers may cause them to turn brown, the microwave is an option when you’re in a hurry. For best results, use a professional microwave flower press following the instructions provided. Place the flower between two pieces of absorbent paper and use 30- to 60-second microwave intervals, allowing the plant material to cool between uses. If you’re pressing multiple sets of blooms, alternate between cooling and heating with two microwave presses. In a pinch, you can create your own microwave flower press using two ceramic tiles and rubber bands to hold them together tightly. Place the flowers between two sheets of absorbent paper, then press them between the tiles. Heat for 30 to 60 seconds at a time, allowing the materials to cool before repeating.
Alternatively, place the flowers inside a book (as long as there’s no metal in the binding) and microwave it for 30 to 60 seconds at a time, checking to see when the flowers are dry. Allow the book to cool for a minute or two between intervals. The flowers should be completely dry in a day or two.
lastly
Pressing flowers is a delightful way to preserve the beauty of blooms and create lasting memories. By choosing the right flowers, utilizing household supplies, and employing the pressing technique that suits you best, you can craft stunning pressed flower art and keepsakes that will brighten your space and warm your heart for years to come. Whether it’s a cherished gift or a personal memento, pressed flowers are a wonderful way to capture the fleeting beauty of nature.
Hi, this is a comment.
To get started with moderating, editing, and deleting comments, please visit the Comments screen in the dashboard.
Commenter avatars come from Gravatar.
Thank you for your post. I really enjoyed reading it, especially because it addressed my issue. It helped me a lot and I hope it will also help others.
I’m so in love with this. You did a great job!!